Wednesday, November 15, 2017

Actions in Bouquet

Sails 1.0 added the concept of actions to the architecture. This has given me an idea to add actions to the bouquet generate suite. An action is basically a function that is called when a route in a controller is accessed. Each action is in it own file. Which makes life very easy for generators. 

Bouquet Actions

I recently (Nov 2017) extended bouquet to handle the creation of Actions for Controllers. The concept behind this is to auto generate tests, command line interface and controllers for the actions created.

Pattern

  1. An action is created for a specific controller. in the controllers/<controller name> directory.
  2. And a corresponding binary is created to access the action. bin/<projectName>-<controller>-<action>.
  3. Next a test for the binary is created in the test/bin directory <controller>-<name>.test.js
  4. Finally a test set of test cases is created for the action via the controller test/integration/<controller>-<name>.test.js

Here is a breakdown of what gets created.


  • api/controllers/<controller>/<action>.js
  • bin/<project name>-<controller name>-<action name>     
  • test/bin/<controller-name>-<action-name>.test.js
  • test/integration/<controller-name>-<action-name>.test.js

Usage

$ sails generate bouquet-Action <controller> <action>
In this example I am generating a action name create for the stack controller.
$ sails generate bouquet-Action stack create 
will generate
# api/controllers/stack/create.js
# bin/bouquet-stack-create
# test/bin/stack-create.test.js
# test/integration/stack-create.test.js

If you have any additional ideas just let me know darren@pulsipher.org.

DWP

Tuesday, August 29, 2017

Building Microservices with SailsJS and NodeJS

I have been developing applications with uServices for sometime. Each time I wrote a new application I could not figure out where to put the uService Definitions. They tended to be spread all over my source tree. Since I was writing my application using sailsjs I wanted to follow the convention over configurability paradigm that they espouse in sails.

Here are some of the things that I tried.


  • api/workers directory - Using the sails_hook_publisher & sails_hook_subscriber
  • api/jobs directory - similar to the workers pattern but using grunt to run processes.
  • deploy directory - Using the micro npm module.

Workers


This method uses the sails_hook_publisher & sails_hook_subscriber plugins to give each instance the ability to subscribe to jobs that are are requested from another service. It assumes that you are using redis as the message queue. And it does not handle the management of starting/stopping or replicating services. It is a good solution but it had the overhead of a full sails application with each worker. It also tied the logical to the deployment models too tightly for me.

Jobs


Very similar to the publish/subscribe worker paradigm but I wanted a light weight mechanism for spinning up small services without all of the overhead of the sails stack. So I basically just fired up small node js scripts that I stored in the jobs directory. Problems with this is lack of flexibility of the micro-service architecture and coupling with the application code.

Deploy


Using the micro npm package to create simple micro services that can handle a HTTP request. I created simple micro services that performed specific tasks for the application. Creating the micro services was actually very simple thanks to the micro package. But Deploying multiple micro services can be hard manage. So I looked to docker and containers to help with this.

I had to come up with a strategy to define/code my microservices, how they would be managed and deployed. I had to remember the key software engineering principles of Cohesion, Decoupling and Reuse in my architecture. So the first thing I worked on was decoupling the microservice deployment from the microservice source code itself.

This gave me the flexibility to change my deployment architecture from source code itself. To do this I looked at defining my deployment architecture using docker both DockerFile and docker compose file formations. To define a microservice I had to do the following.


  • create a package.json file with all of the packages needed to run my microservice
  • create a Dockerfile to build the image of my microservice
  • add the microservice to a docker-compose file for the application.

package.json


The package.json file contains the npm packages that my microservice depends on as well as an scripts that are needed to manage my microservice including a build and deploy script. Note that when I build my microservice image I tag it with a local registry service using "localhost:5000/appName/userviceName" where appName is the name of the application and userviceName is the name of the microservice that I am creating. This is just an example of a naming convention that I like to use. If I was creating a microservice that I was going to use over and over again I would use a different name. The deploy target pushes the image into the local registry so I can use the image in the docker swarm that I am running.

 {
  "main": "index.js",
  "scripts": {
    "start": "micro",
    "build": "docker build . -t localhost:5000/appName/userviceName",
    "deploy": "docker push localhost:5000/appName/userviceName"
  },
  "dependencies": {
    "micro": "latest",
    "node-fetch": "latest"
  }

Dockerfile

The dockerfile in this case is very simple. I am writing all of my micro-services in node so I start with the base image. Next I simply copy the package.json file to an application directory and I copy any of the source code into the application directory. Then I call "npm install" this will install all of the packaging that are required by my micro-service for the image. Then the last statement launchs the microservice by calling "npm start".

FROM  node:latest
RUN mkdir -p /usr/src/app
WORKDIR /usr/src/app
COPY package.json /usr/src/app/
RUN npm install
COPY . /usr/src/app
EXPOSE 3000
CMD npm start

docker-compose.yaml

The docker-compose.yaml file contains the services and their deployment configurations for the application. For my application I have a simple web server that is the main microservice for my application. It is a sailsjs application. I try to always name my web interface micro-service "web". It is easy for me to find them later. Again in the file below I have appName as the name of the application. Also you can see the micro-service definition is runing 5 replicas and the image is the same one as defined in the Dockerfile above.

version: '3'
services:
  mongo:
    image: mongo
    expose:
         - 27017
    ports:
         - "27017:27017"
  appName:
    image: localhost:5000/appName/web
    expose:
      - 1337
    ports:
      - "1337:1337"
  userviceName:
    image: localhost:5000/appName/userviceName
    deploy:
            mode: replicated
            replicas: 5

Bouquet Generator implementation

I have created a sails generator to generate the directory heiarchy as well as simple micro-services that you can use as a starting point for your own micro-service application check out the documernation at https://github.com/madajaju/bouquet/tree/master/sails-generate-bouquet-uservice. Or you can install it by installing the node.
# npm install sails-generate-bouquet-uservice --save.


I hope this helps you with your journey to building your own sails application using micro-services.
For more information on the Bouquet sails generators check out my previous blog post at https://darrenpulsipher.blogspot.com/2017/05/resurrecting-bouquet_3.html.

DWP

Wednesday, May 3, 2017

Resurrecting Bouquet

Bouquet

In the 1990s I started dabbling with a new kind of system analysis. Object Oriented System Analysis. I quickly became familiar with all of the great OOA/D tools. The one that stood out for me was Rational Rose. I dove right in and over time became quiet proficient in using the tool. I quickly started writing scripts to to make my life easier and automate repeated tasks. This was the birth of a project named Bouquet.
Move forward 20 years. I am still using UML to design and architect systems, but I also use rapid prototyping technologies like sails, rails and grails. Most recently I am focusing on NodeJS/SailsJS development. I dusted off my old Bouquet specs and started working on resurrecting Bouquet with the latest technologies.
These are the technologies that I am leveraging this time.
  • PlantUML - Textual way of describing UML diagrams
  • SailsJS - MVC framework for NodeJS development
  • Commander - npm module for command line programming for NodeJS
  • GitHub MD - Markdown language for projects in GitHub.
The tools by themselves are very useful. Bringing all the tools together is where I found the most benefit.

PlantUML

PlantUML is a component that lets you quickly write several UML diagrams using Text instead of a drawing tool. It is great for many but not all of the UML diagrams. I have found that it covers everything that I typically need to do for Architectures of systems. UseCase, Component, Class, Deployment, Scenarios, and Activity Diagrams.
One of the benefits of using PlantUML that the text files that your create (*.puml) can be checked in to GitHub. You can also generate image files (png) from the text files (puml) and check in the image files as well. I do this so my design documents in GitHub (Markdown language is used) can reference the images that have been generated. Generating the image (png) files is as easy as typing in a command line.
# java -f design/plantuml.jar myDiagram.puml
Because I am using NodeJS. I can use a npm script command to actually generate all of the my images. Basically I put another target in my package.json file in the root directory that searches all of my design directories and generates the png files.
  "scripts": {
  ...
  "design": "java -jar design/plantuml.jar design/*.puml design/**/*.puml",
  ...
  }
Now you can generate png files for all of your design diagrams, just type.
# npm run-script design 
To find out more about PlantUML click here You can download the latest jar file for quick image generation here. There is also a Plugin for PlantUML for Intellij and several other IDEs.

SailsJS

SailsJS is a MVC convention over configuration framework for NodeJS applications. This uses a common pattern that can be found in several programming languages today. Examples include Ruby o Rails, and Groovy on Grails.

Commander

Commander is a nodejs module for command-line processing. I use this to develop command line interfaces for the systems that I architect. This gives me a quick and dirty way of providing a command line interface with very little lifting.

GitHub MD

MD - Markdown language is used to quickly and easily document a git hub repository. The language allows for simple text based documentation to make it quick and easy.

Bouquet

Using the concept of convention over configurability of SailsJS, I extended the same concepts that already exist in SailsJS and created a design and bin directory in the project root directory. This gives me a place to put the design of the architecture as well as the CLI (Command Line interface) of the system being architected. This is important because most of the architectures I am working have a Web, REST and CLI .

Directory Hierarchy

After a SailsJS project is created a standard directory hierarchy contains several directories and files. I added two additional directories to the top level (bin, design, and test). Next, I add corresponding subdirectories in the design directory as shown below.
  • api - Standard SailsJS directory
  • assets - Standard SailsJS Directory
  • bin - Contains commander binaries
  • config - Stanard SailsJS Directory
  • design - Contains Architecture and Design of the system
    • Actors - Actors of the system
      • README.md - ReadMe for all of the Actors
      • < Actor Name > - Directory for each Actor of the system
    • UseCases - Use Cases of the system
      • README.md - ReadMe file for all of the UseCases
      • UseCases.puml - PlantUML file for all of the Use Cases and Actors
      • < UseCase Name > - Directory for each Use Case of the system
    • Systems - System Components
      • README.md - ReadMe for all of the sub-systems
      • < Sub System Name > - Directory for each sub system.
    • README.md - Top ReadMe for the Architecture and Design
    • Architecture.puml - Top level architecture plantUML diagram
    • plantuml.####.jar - plantUML jar file used to generate png files.
  • tasks - Standard SailsJS Directory
  • test - Contains test for the system.
    • bin - Test the CLI
    • Actors - Test the Actor interactions One Test Suite per Actor with each use case
    • UseCases - Test the Scenarios as described. One Test Suite per Scenario with tests for each different path through the scenario
    • System - Test of each subsystem. One Test Suite for each SubSystem, a test for each of the interface calls.
  • views - Stand SailsJS Directory

Future 

I know as I start using this I will add more generated artifacts to the system. So if you have any ideas please let me know. You can find more at the github project

Wednesday, April 12, 2017

Docker Container DNS Problem - The Fix

The DNS Problem

I recently ran into a problem with my containers not being able resolve names to ip addresses. I found this problem when I was installing Jenkins in a container. When I got to the step to install plugins jenkins said it was not connected to the internet. So I do a couple of checks.

First I got the Container ID from docker.
# docker ps
CONTAINER ID        IMAGE                                                                                 COMMAND                  CREATED             STATUS                  PORTS                 NAMES
91aa53f4642a        jenkins@sha256:c0cac51cbd3af8947e105ec15aa4bcdbf0bd267984d8e    7be5663b5551bbc5f4b   "/bin/tini -- /usr..."   5 hours ago         Up 5 hours  
 Notice the Container ID is 91aa53f4642a now you can attach to the container and run any system command you want.
#docker exec -it 91aa53f4642a /bin/bashjenkins@91aa53f4642a:/$ ping www.google.com
The ping command returned not found. Next I checked if I could actually get to an external IP address.
jenkins@91aa54f4642a:/$ ping 8.8.8.8
When I ran this I got access to the remote site. So I have internet connectivity, but no name resolution.

The Fix

Turns out this is a known problem with docker 1.11 and on. When the resolv.conf is created for for the container it does its best to handle inter-container name and service resolution, but it does not handle the external name resolution. In order to make this happen the host machine of the docker container must start dockerd with the --dns option set to an external DNS like 8.8.8.8.

First you have to find out how dockerd is getting started. if you are using Linux this is probably in the systemctl subsystem. For CentOS you can find this by using the systemctl command.
# systemctl show docker.service | grep Fragment
FragmentPath=/usr/lib/systemd/system/docker.service
Now look at the docker.service file and look for the ExecStart. /usr/lib/systemd/system/docker.service
[Unit]
Description=Docker Application Container Engine
Documentation=https://docs.docker.com
After=network.target firewalld.service
[Service]
Type=notify
# the default is not to use systemd for cgroups because the delegate issues still
# exists and systemd currently does not support the cgroup feature set required
# for containers run by docker
ExecStart=/usr/bin/dockerd 
ExecReload=/bin/kill -s HUP $MAINPID
# Having non-zero Limit*s causes performance problems due to accounting overhead
# in the kernel. We recommend using cgroups to do container-local accounting.
LimitNOFILE=infinity
LimitNPROC=infinity
LimitCORE=infinity
# Uncomment TasksMax if your systemd version supports it.
# Only systemd 226 and above support this version.
#TasksMax=infinity
TimeoutStartSec=0
# set delegate yes so that systemd does not reset the cgroups of docker containers
Delegate=yes
# kill only the docker process, not all processes in the cgroup
KillMode=process
[Install]
WantedBy=multi-user.target
Now edit this file and change the ExecStart to include the --dns option.
ExecStart=/usr/bin/dockerd --dns=8.8.8.8 
This will tell all of the containers that get started on this host to use 8.8.8.8 as the secondary dns service after the inter-container dns service. Now that you have made the change then you need to restart the docker daemon.
# systemctl daemon-reload
# systemctl restart docker.service
That is all you need to do. Now you check things out by running ping in the container again.
#docker exec -it 91aa53f4642a /bin/bashjenkins@91aa53f4642a:/$ ping www.google.com
Hope this helps you out with this problem.


DWP

Tuesday, April 11, 2017

Fault Tolerance Jenkins with Docker Swarm

Installing Docker Swarm

I have chosen to use CentOS 7 for my cluster of machines. So these instructions are for CentOS 7.
First I need to install docker on all of the machines in the cluster.

Set up yum so it can see the latest docker packages.
# sudo yum-config-manager --add-repo https://download.docker.com/linux/centos/docker-ce.repo

Next install docker onto each machine in your cluster.
# sudo yum install docker-ce
Once you have installed docker on every node in your cluster you can now set up your swarm. First you have to choose which machines will be your manager(s).

On one of the masters you need to initialize the swarm
# docker swarm init
If your machine has more than one network then you will need to specify the ip address to use for the master.
# docker swarm init --advertise-addr 172.16.0.100
Swarm initialized: current node (a2anz4z0mpb0vmcly5ksotfo1) is now a manager.
To add a worker to this swarm, run the following command:
    docker swarm join \    --token SWMT....wns 172.16.0.100:2377
To add a manager to this swarm, run 'docker swarm join-token manager' and follow the instructions.


In this example the IP address is 172.16.0.100 for the swarm master. Now on each worker node I just run the join command as specified in the output of the init command.
# docker swarm join --token SWMT...wns 172.16.0.100:2377
If you want to add another master then you run the command
# docker swarm join-token manager
It will tell you exactly what you need to do.

Setting up Jenkins in your Swarm

Now this is the easy part. Sort of. With docker swarm and services this has just gotten much easier. There are several docker images that are available with jenkins already installed in them. So it is best if we just use one of them. The most popular is "jenkins". Go figure. Now with the image name all we need to do is start a service in the swarm. We can simply write a small compose file and we will be set.
# docker-jenkins.yaml
version: '3'
services:
  jenkins:
    image: jenkins
    ports:
      - "8082:8080"
      - "50000:50000"
    environment:
      JENKINS_OPTS: --prefix=/jenkins
    deploy:
      placement:
        constraints: [node.role == manager]
    volumes:
      - $PWD/docker/jenkins:/var/jenkins_home
There are a couple of things to note. 
  • Ports -  First the ports are mapped to 50000 and 8082. This are external ports and will be accessible outside of the container.
  • Environment - You can set any jenkins options on this line any following environment lines
  • Volumes - This will give us the ability to "mount" a directory from the host machine into the container. So if the container goes down we still have our jenkins installation.  You will need to create the directory using
# mkdir ~/docker/jenkins && chmod 777 ~/docker/jenkins
if you don't do this you will have problems with jenkins coming up.

Now it is time to actually start the service.
# docker stack deploy -c docker-jenkins.yaml buildCreating network build_default
Creating service build_jenkins

Two things where created when the deploy was run. A default network "build_default" and the service "build_jenkins" notice all of the artifacts created will begin with "build_". The default network is created when a network is not specified.

Now you should be able to access the jenkins web site at
http://172.16.0.100:8082/jenkins

Jenkins now requires a password when you install. You can find the password in the secrets directory in the docker/jenkins base directory.
# cat ~/docker/jenkins/secrets/initialAdminPassord
asldfkasdlfkjlasdfj23iwrh

Cut and paste this into your browser and you will be set and ready to go.

Debugging Tools

Here are a couple of things I found useful when I was setting up the environment.

# docker ps
CONTAINER ID        IMAGE                                                                             COMMAND                  CREATED             STATUS              PORTS                 NAMES
91aa53f4642a        jenkins@sha256:c0cac51cbd3af8947e105ec15aa4bcdbf0bd267984d8e7be5663b5551bbc5f4b   "/bin/tini -- /usr..."   5 hours ago         Up 5 hours          8080/tcp, 50000/tcp   build_jenkins.1.abu55c8tybjwrsd35ouaor1d2

Shows the containers that are currently running. This will include the containers that are running the services. I found that some of the containers never started up. So I was trying to find out what happen. So I ran the following command:
# docker service ps build_jenkins
 ID            NAME                 IMAGE           NODE               DESIRED ST    ATE  CURRENT STATE        ERROR                      PORTS
abu55c8tybjw  build_jenkins.1      jenkins:latest  node0.intel.local  Running            Running 5 hours ago
nac73zp1gc68   \_ build_jenkins.1  jenkins:latest  node0.intel.local  Shutdown           Failed 5 hours ago   "task: non-zero exit (1)"
xyrmzvx1pnnp   \_ build_jenkins.1  jenkins:latest  node0.intel.local  Shutdown           Failed 5 hours ago   "task: non-zero exit (1)"
phycp5ypp61o   \_ build_jenkins.1  jenkins:latest  node0.intel.local  Shutdown           Failed 5 hours ago   "task: non-zero exit (1)"
o3ewixv3hvcy   \_ build_jenkins.1  jenkins:latest  node0.intel.local  Shutdown           Failed 5 hours ago   "task: non-zero exit (1)"
This will show the tasks for the services before the containers get launched and their status.

Friday, April 7, 2017

KubeCon 2017 Europe

KubeCon was held in Berlin this spring. As this is a developer focused conference it was most definitely a Tee-Shirt conference. Intel had a small booth where we had continuous demos of Secure Clear Containers and Kubernetes Federation. Intel was a Diamond Sponsor of the event. The big announcement was the release of Kubernetes 1.6 with its added features.

  • Rolling updates with DaemonSets
  • Beta release of kubernetes federation
  • improved networking functionality and tools
  • Improved scheduling
  • Storage Improvements
  • New adm tool for enterprise customers.

The biggest buzz around the show was default networking, storage and security. Typically Kubernetes chooses configurability over convention, which leads to longer setup time and variability in deployments specify around networking and storage. Security is a hot topic/issue with all container technologies, not just kubernetes.

One of Kubernetes biggest complaints is it is hard to get up and running, especially around network configurations. With 1.6 some network aspects come configured out of the box. For example etcd comes installed and configured (Service Discovery), CNI is now integrated with CRI by default and a stand bridge plugin has been validated with the combination. This decreases the amount of time and variability in previous releases. These are welcomed changes in the distro.

Another big issue with Kubernetes and Containers in general is lack of support of storage. Kubernetes is taking a clue from OpenStack here
and are supporting more Software Defined Storage options. Kubernetes gives the ability to plugin to Ceph, Swift, Lustre and other basic Storage sub-systems. But they are not planning on supporting a storage solution themselves. The announcement at KubeCon was an increased focus on Persistent Volumes. It will be interesting to see how a focus in this area will change the community from compute focused to complete solution focused. Time will tell if it takes.

As I worked the booth for two days and attended sessions which were standing room only,  it was good to interact with developers and hear their problems and concerns about working in the data-center. There was interest in the Kubernetes Federation demo which was somewhat problematic, but gave plenty of talking points. The Secure Clear Containers got lots of traffic and buzz. Many of the conversations were around secure as it is still a major problem with containers in general. Everyone was looking for what was available in the security area.

On a personal note I got the opportunity to meet a long lost cousin from the Pulsipher/Pulsifer side of my family. He was excited to see another Pulsipher and thought he was the last of his family out there. It was fun to share family stories and he got to hear about our common Ancestor which came into the Americans in the 1640s. It was also a great technical contact as he works for Spotify and works as the Director of Security in their data center.

DWP

Sunday, April 2, 2017

Moving Docker Compose to Docker Stack

Ok. I am finally moving from Docker Compose to Docker Stack. It has been a while since I updated my Docker environment and I am very happy with the direction that docker has moved. They have moved in the direction that I am personally have been promoting. Check out my blog on Services in Multiple environments. Multiple Environment Development.

Swarm Concepts

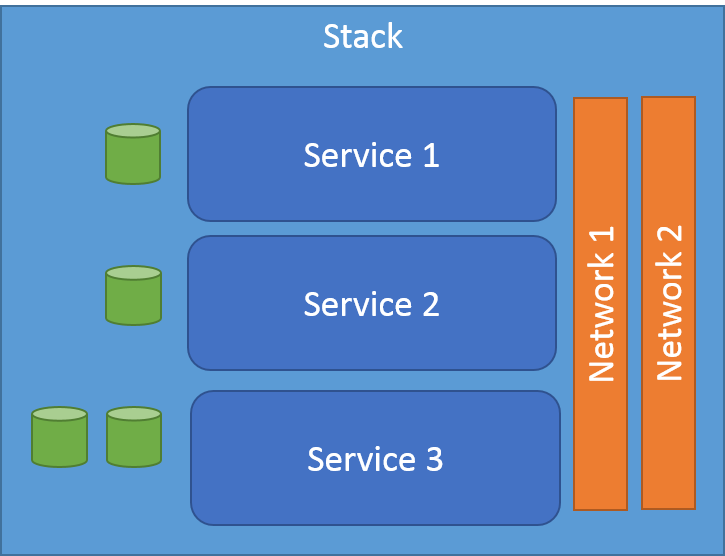
The first thing I did was read up on the changes in concepts between compose and stack. Docker introduced new concepts of Stack, Service and Task. The easiest way to think of it is a Stack consists of several services, networks and volumes. A Stack can represent a complex application that has multiple services.

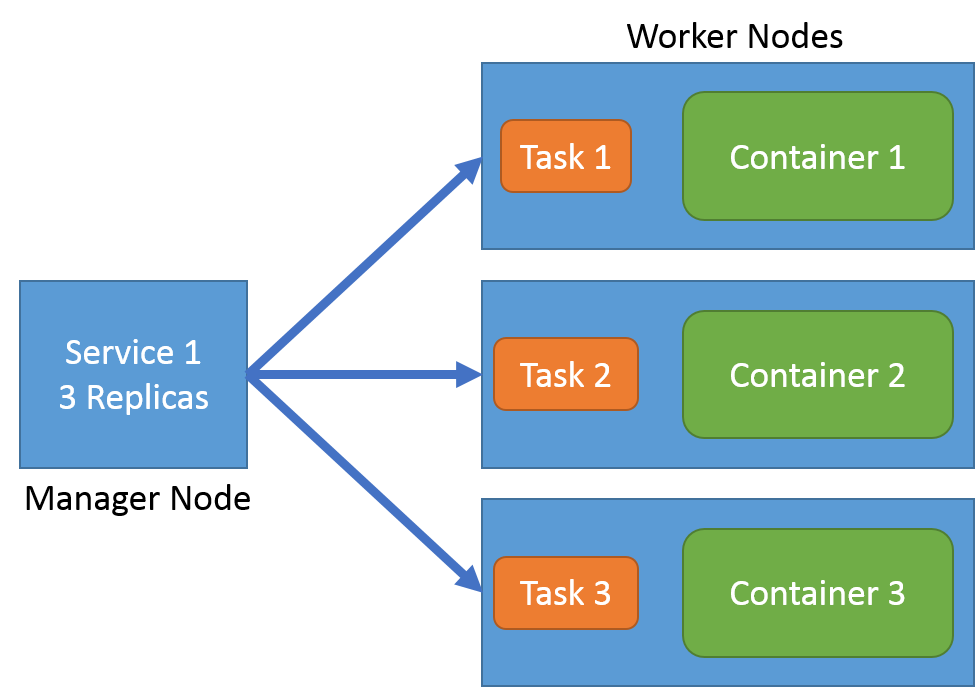
A Service can have a set or replicas that consists of a image running in a container and tasks that are run on the container. A Service has State. This is where things are different between compose and stack. Compose launches all of the containers and runs tasks and then forgets about it. Stack can keep track of the state of the containers even after they have been launched. This means if a container that correlates with a service goes down it will launch another one in its place based on policies. Basically your application will be kept up by Swarm. Built in HA, load balancing and Business continuity.

When you specify a service you specify:

  • the port where the swarm will make the service available outside the swarm
  • an overlay network for the service to connect to other services in the swarm
  • CPU and memory limits and reservations
  • a rolling update policy
  • the number of replicas of the image to run in the swarm
Notice the word Swarm here. You must have a docker swarm before you use services and stacks. 

Practical differences

Compose files can be used for Stack deployments. But there are a couple of things to watch out for.
  • "buid" is not supported in stack you have to build with docker build
  • "external_links" is not supported in stack this is covered by links and external hosts.
  • "env_file" is not supported in stack you have to specify each environment variable with "environment"
Wow! That was a problem for me because my compose file had build directives for my project and had env_file to pass in environment variables. Now I had to make changes to make things work the way before.

"build" Alternative

Simply put stack services only take images. So that means that you must build your image before you deploy or update your stack. So instead of just specifying the build in the service definition you must call docker build before calling docker stack deploy.

File: docker-compose.yaml

etsy-web:
  build: .
  expose:
    - 80
    - 8080
    - 1337
  links:
    - etsy-mongo
    - etsy-redis
  ports:
    - "1337:1337"
    - "80:80"
  command: npm start 

And to launch my containers then I just call

# docker-compose up

To make this work properly we need to remove the build line above. And replace it with an image key.

etsy-web:
  image: etsy-web
  expose:
    - 80
    - 8080
    - 1337
  links:
    - etsy-mongo
    - etsy-redis
  ports:
    - "1337:1337"
    - "80:80"
  command: npm start

Then you have to build the etsy-web image first and then deploy the stack

# docker build .
# docker stack deploy --compose-file docker-compose.yaml

So it is that easy. Change one key in your yaml file and you can be up and running.

env_file alternative

With stack you specify the environments using the environment tag.
This can be using dictionary or array formats.

Dictionary

environment: 
  PASSWORD: qwerty
  USERNAME: admin

or Array

environment:
  - PASSWORD=qwerty
  - USERNAME=admin

Also take note that the environment variables in the docker-compose.yaml file override any environment variables defined in the dockerfile for the container. Additionally environment variables can be passed into the command line when calling "docker stack". These environment variable override the environment variables in the both the docker-compose.yaml and dockerfile.yaml files.

external_links alternative

"stack" uses link and external hosts to establish service names that are looked up when the containers are launched. This is a change from before when a changes to /etc/hosts was changed for each container to establish container connectivity. See Docker Service Deiscovery.


Benefits of Stack

Even though there are changes to some of the yaml file format and some additional command line options the benefits of having services over containers, stacks over containers is huge. I can now have a managed stack that keeps my services up and running based on policies that I have established for the each service. 

DWP